Building a crossbuck fence is one of those projects that screams "I’m a hands-on person." It’s not just about creating a barrier; it’s about adding character and function to your property. Whether you’re looking to enhance privacy, secure your backyard, or simply spruce up the place, this guide will walk you through the ins and outs of constructing a crossbuck fence like a pro. So grab your tools, and let’s get started!
Listen up, folks. A crossbuck fence isn’t just any old fence. It’s got style, it’s got purpose, and it’s got that rustic charm that makes your yard stand out. But before you dive headfirst into the project, you need to know what you’re getting yourself into. This ain’t a weekend job unless you’ve got some serious experience under your belt.
Now, if you’re here, chances are you’re either a beginner or someone who’s ready to take their DIY skills to the next level. And that’s awesome! Building a crossbuck fence isn’t rocket science, but it does require planning, patience, and a bit of elbow grease. Stick with me, and I’ll show you how to do it right.
Read also:Beyonceacute Meme Gun The Viral Phenomenon Taking Over The Internet
Why Choose a Crossbuck Fence?
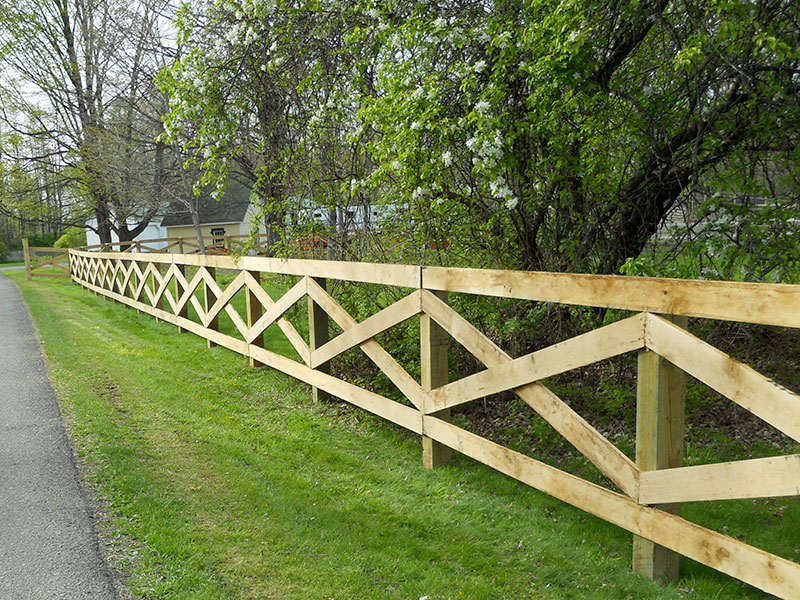
Let’s talk about why the crossbuck fence is such a big deal. First off, it’s got that classic, timeless look that fits perfectly in both rural and suburban settings. Second, it’s super durable, especially if you use high-quality materials. And third, it’s relatively easy to maintain once it’s up. Plus, it adds a touch of elegance without breaking the bank.
Here’s the deal: crossbuck fences are great for privacy, security, and even aesthetic appeal. They’re not just about keeping critters out or kids in—they’re also about making your property look sharp. And who doesn’t want that?
Tools and Materials You’ll Need
Before we get our hands dirty, let’s go over the tools and materials you’ll need to build a crossbuck fence. You don’t want to start the project only to realize you’re missing something crucial. Here’s the lowdown:
- Wooden posts (treated lumber for durability)
- Crossbucks (usually made from cedar or pressure-treated wood)
- Post hole digger
- Concrete mix (for setting posts)
- Nails or screws (galvanized to resist rust)
- Level
- Measuring tape
- Hacksaw or reciprocating saw (for cutting posts)
- Drill
- Safety gear (gloves, goggles, etc.)
Trust me, having all your ducks in a row before you start will save you a ton of time and frustration. And hey, if you’re missing something, now’s the time to grab it!
Step 1: Planning Your Fence Layout
Planning is key when it comes to building a crossbuck fence. You don’t want to end up with a crooked fence or uneven spacing. Start by measuring the area where you want the fence to go. Then, decide on the height and spacing of your posts.
Most crossbuck fences are around 4-6 feet tall, but it depends on your needs. Once you’ve got your measurements, mark the spots where your posts will go using stakes and string. This’ll help you visualize the layout and make adjustments if needed.
Read also:Top Games Like Style Savvy For Fashionistas And Trendsetters
Pro Tip: Double-Check Your Measurements
Measure twice, cut once. It’s an old saying, but it’s gold when it comes to DIY projects. Take the time to double-check your measurements before you start digging or cutting. Trust me, you’ll thank yourself later.
Step 2: Digging Post Holes
Alright, now it’s time to get your hands dirty. Grab that post hole digger and start digging. Your post holes should be about 2-3 feet deep, depending on the height of your fence. The deeper the hole, the more stable your fence will be.
Once you’ve got your holes dug, it’s time to set the posts. Make sure each post is level and secure. You can use a level to check, and then fill the hole with concrete mix. Let the concrete cure for at least 24 hours before moving on to the next step.
Common Mistake: Shallow Holes
One of the biggest mistakes people make is digging shallow holes. This leads to unstable posts, which can compromise the integrity of your fence. Don’t skimp on depth—it’ll pay off in the long run.
Step 3: Installing the Crossbucks
Now that your posts are up, it’s time to install the crossbucks. Start by measuring and cutting the crossbucks to the right length. They should be evenly spaced and securely attached to the posts.
Use galvanized nails or screws to attach the crossbucks. This’ll help prevent rust and ensure your fence lasts for years to come. Make sure each crossbuck is level and aligned with the others. Consistency is key here.
Pro Tip: Use a Template
Creating a template for your crossbucks can save you a ton of time. Just cut one crossbuck to the right size and use it as a guide for the rest. This’ll help you maintain consistency and avoid mistakes.
Step 4: Finishing Touches
With the posts and crossbucks in place, it’s time to add the finishing touches. This might include staining or painting your fence to match your property’s aesthetic. You can also add decorative elements, like caps or trim, to give it that extra flair.
Don’t forget to inspect your fence for any loose nails or screws. Tighten them up if needed, and give your fence a good once-over to make sure everything’s secure. A little extra effort now will save you headaches down the road.
DIY Bonus: Add Lighting
Consider adding some outdoor lighting to your fence. It’ll not only enhance the look but also improve safety and security. Solar-powered lights are a great option if you want to keep things eco-friendly.
Common Challenges and Solutions
Every project comes with its own set of challenges, and building a crossbuck fence is no exception. Here are a few common issues you might face and how to solve them:
- Uneven Ground: Use a laser level to ensure your posts are all at the same height.
- Cracked Concrete: Make sure the holes are deep enough and the concrete is mixed properly.
- Warped Wood: Choose high-quality, straight pieces of wood to avoid this issue.
Remember, patience is your best friend when it comes to DIY projects. Take your time, and don’t be afraid to ask for help if you need it.
Cost Considerations
Building a crossbuck fence can vary in cost depending on the materials you choose and the size of your project. On average, you’re looking at around $10-$20 per linear foot for materials alone. Labor costs can add up quickly, so doing it yourself can save you a pretty penny.
Don’t forget to factor in the cost of tools and safety gear if you don’t already have them. And if you’re planning to stain or paint your fence, budget for that too. A little planning upfront can help you avoid surprises later.
Money-Saving Tip: Shop Around
Prices for materials can vary from store to store, so it pays to shop around. Check out local hardware stores, online retailers, and even salvage yards for deals on wood and supplies.
Maintenance Tips for Your Crossbuck Fence
Once your fence is up, it’s important to keep it in good condition. Regular maintenance will help it last longer and look better. Here are a few tips:
- Inspect your fence annually for signs of wear and tear.
- Reapply stain or paint as needed to protect the wood.
- Clear debris from around the base of the posts to prevent rot.
- Repair any damaged sections promptly to prevent further damage.
A well-maintained fence will give you years of enjoyment and add value to your property. It’s a small price to pay for such a big payoff.
Long-Term Benefits
Investing in a crossbuck fence isn’t just about aesthetics. It can also increase your property value, provide security, and enhance your outdoor living space. Plus, there’s something incredibly satisfying about building something with your own two hands.
Conclusion: Ready to Build Your Crossbuck Fence?
Building a crossbuck fence might seem intimidating at first, but with the right tools, materials, and know-how, it’s totally doable. Follow the steps in this guide, and you’ll have a beautiful, functional fence in no time.
So what are you waiting for? Grab your tools, gather your materials, and let’s get building! And when you’re done, don’t forget to share your success story in the comments below. We’d love to hear about your experience.
Table of Contents
Tools and Materials You’ll Need
Step 1: Planning Your Fence Layout
Step 3: Installing the Crossbucks
Common Challenges and Solutions
Maintenance Tips for Your Crossbuck Fence